
Previous Tips & Tricks posts covered prepping our materials, knitting double stranded, making a gauge swatch, blocking, and what to do if you need to adjust your tension. In this final post before the CKAL begins next Wednesday, I’ll be giving some tips regarding the embroidery stitches we’ll use to create the bird design.
Our gauge swatches are ideal to stitch onto to get a feel for the embroidery and how the yarn behaves. I’ve also made videos with info for both crocheters who’ll be cross stitching, and for knitters who’ll be using duplicate stitch (also known as Swiss darning). You can also find charts for the little motifs I stitched onto the swatches below.
First make sure you have read the version of Tips and Tricks that you need, ie knit or crochet in your preferred language: English (both US & UK terms for crochet), Dutch or German. Armed with that, and the info below, you’ll be well prepared for the CKAL!
Very Important Notes for Both Knitted & Crocheted Versions!
- Cut lengths of Cahlista appropriate for the area you are about to embroider. (You will soon get to know approximately how much you will need.) However, never cut a length more than 80cm long. Beyond this length the yarn will be passing through the fabric too many times and will start to look ragged.
- We won’t be sewing in the yarn tails for either the duplicate stitch or the cross stitch. Instead we’ll use a knotting technique that is efficient with the Cahlista yarn. Using this technique ensures you won’t run out of yarn. The back may look a bit unsightly but the density of the fabric + surface stitching means that the knots will be neither seen nor felt from the front.
How do I Secure the Ends?
Leave a starting tail of yarn 5cm long dangling at the back of the work. When you have finished stitching the area you need, unthread the needle and trim the end tail at the back to 5cm also. Now secure one tail at a time: use the tapestry needle tip to gently separate the Cahlista strands evenly into two. Use the 2.5mm crochet hook to pull one half of the strands under a nearby stitch at the back of work. Tie both halves back together with a double knot and trim ends to 1.5cm. Repeat for other tail. (As the strands are knotted over another stitch, this ensures tails stay at the back.) You’ll see how this is done in the videos below.
Adding Cross Stitch to Crochet

I’m sure many of you will have worked cross stitch before, even if it was way back at primary school on a piece of binca! Traditional cross stitch is a counted embroidery stitch worked from a chart that tells you what colour to use and where. The X-shaped stitches are made on a piece of evenweave fabric (in our case the crocheted cushion front). A diagonal stitch, or half cross stitch is made first, then a diagonal stitch in the opposite direction completes the stitch. It’s very straightforward!
I make my first diagonal stitch bottom left to top right (or top right to bottom left if more appropriate for the direction I’m stitching) then finish with a second diagonal stitch slanting in the opposite direction to complete the cross. You can make crosses whichever way feels most comfortable, though the end result is much neater when your top diagonal stitch always slants in the same direction.
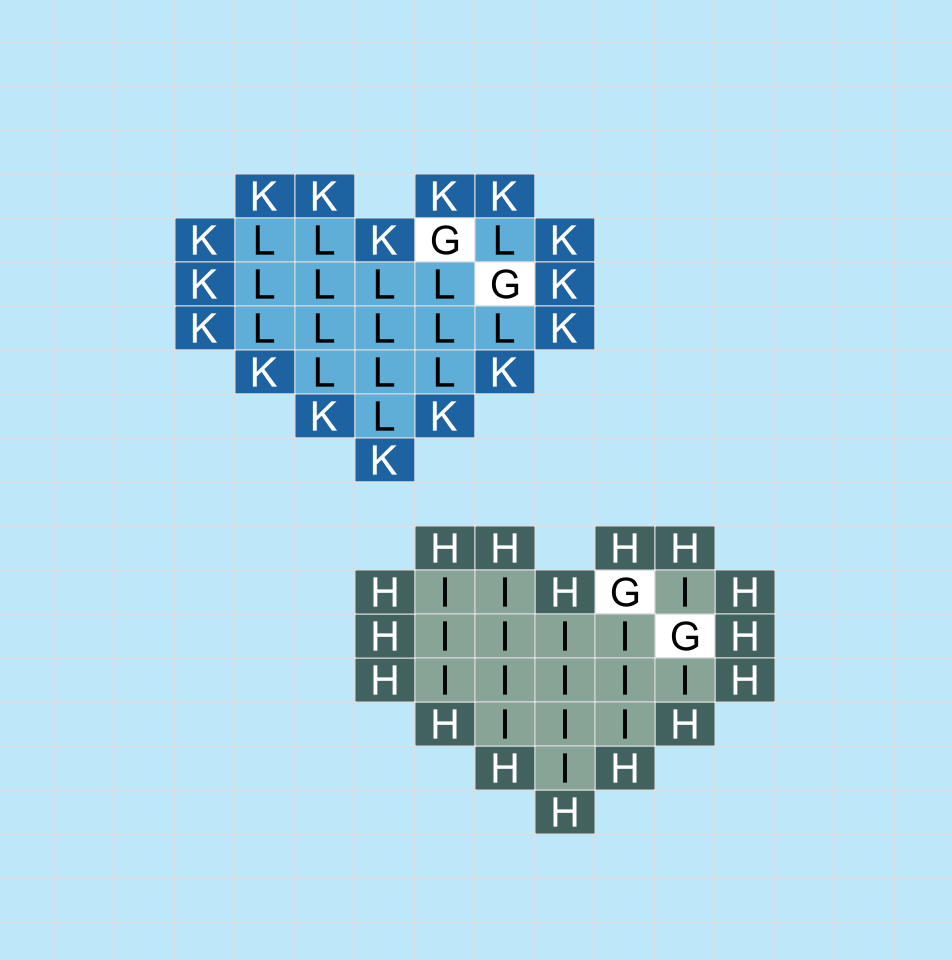
Here’s a simple cross stitch chart of the motif used in the video (ignore the blooper at the end – so professional 😆!) that you can use if you’d like to practise your stitches. The letters correspond to the shades mentioned under Materials in Tips & Tricks.

Here is the embroidered gauge swatch that I stitched during the video.

Adding Duplicate Stitch to Knitting
Duplicate stitch is a decorate stitch worked over knitting. It creates a matching stitch over your stocking stitch. It enables you to use a different yarn to your knitted piece and you can easily incorporate far more colours in your project than you could with Intarsia, which becomes complicated with more than a handful.
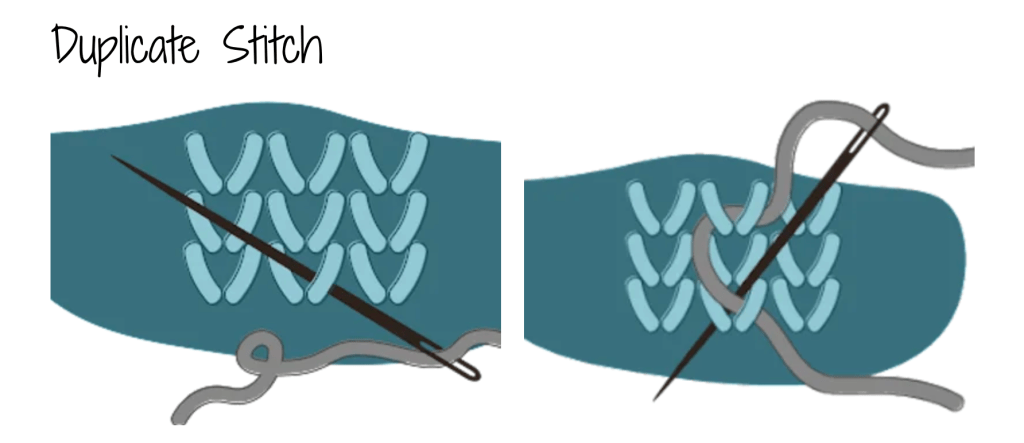
How do I Make a Duplicate Stitch?
- Referring to above diagram, bring the needle from the back (wrong side ) of your knitting to the front, emerging at the bottom of the ‘V’ where you want to place your stitch.
- Pass the needle under the ‘legs’ of the ‘V’ one stitch above, taking care not to pierce any strands of yarn. In the video, I demonstrate passing it left to right. I’m left handed and it feels more comfortable that way. You can go under the ‘legs’ in whichever direction you like, but try to be consistent throughout for the neatest results.
Here’s a simple duplicate stitch chart of the motif used in the video that you can use to practise your stitches. The letters correspond to the shades mentioned under Materials in Tips & Tricks.
Here’s the embroidered gauge swatch that I stitched during the video.

Hopefully I’ve covered everything you might need to know. If you have any CKAL questions, or want to share photos of your embroidered swatches, you can post them in Scheepjes Official Dutch and International Facebook groups.

2 thoughts on “Blue Tit Cushion Tips & Tricks Part 3: The Embroidery Stitches”